Nailcollage

Showing posts with label stampingplate. Show all posts

Sunday, November 8, 2015

Dandelion Waterdecals, Review for Born Pretty Store


For today I have another review for a Born Pretty Store-product and that is 'Dandelion Waterdecals', productnumber #21777

You can get them HERE or you can go to the Born Pretty Store and search for #21777

To show you how beautiful these waterdecals are, I've made a design in which I also used BP-069 stampingplate, you can find that here, productnumber #20042.
The image that i used is the little girl blowing at the dandelions and for my other 3 fingers I used the waterdecals.

These decals are so easy to use: just cut the decals that you want from the sheet, put them in water for 10-20 seconds, slide the decals of the sheet and place them on your nail. Dab the excess water of and you are ready!
The decals are so superthin, that you can't see them lying on you nail and that is so important to me. And in that, these decals succeed!

For the background I used BPL-013, which you can find here and a lot of colors to make a multicolored gradient.


I really love these decals and the stampingplates I've used for this design.
The next photo's are close-ups so you can even see the images and decals better.

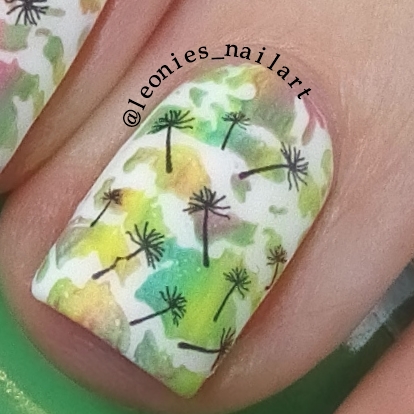


What do you think of these decals? Do you love them as much as I do??

If you want to buy them, go to  the website and search for productnumber #21777 and they are on sale now!
If the sale is over or you see other products (like the stampingplates: here and here) that you like, you can use my code LWGK31 to get 10% of your order.


Saturday, October 17, 2015

Peacock Foil, Review for Born Pretty Store

Hi guys,

I have another review today and it is for the peacock foil from the Born Pretty Store.
You can go directly to it, via this link or search itemnumber #21775 on the website.

The foil comes in a plastic container and as you can see in the first photo, you can do a lot of nailart with one roll of the foil.


Because I didn't know what the best color nailpolish would be as the basecolor, I just painted my nails in 4 colors: blue, green, gold and silver and then added nailglue and when this was translucent and sticky, I applied the nailfoil.


This is the nailfoil over a darkblue base. 


 This is the nailfoil over silver nailpolish.


This is the nailfoil over green nailpolish.
This is the nailfoil over golden nailpolish.


I decided I liked the nailfoil over the golden base best, so I painted my nails with a golden Catrice polish and applied the nailfoil on 3 nails. On my accentnail I stamped a Peacock from stampingplate BP-004, also from the BPS.


What do you think? Is Gold also your favorite color under the nailfoil, or would you have chosen another color?
Don't forget my use my code, LWGK31,  you get 10% of your purchase in the Born Pretty Store.
You can use your code for the nailfoil, itemnumber #21775 or for the thousands of other products.


See you next time!!


Monday, October 5, 2015

Silver Stampingpolish, Review for Born Pretty Store


Hi guys!

Sorry for the lack of blogs, but I was send some products by BornPrettyStore to review, so no better time then today to make a blogpost!

My first review is of this Silver Stampingpolish by BornPretty, itemnumber #22321


As you can see in this picture it is a very pigmented stampingpolish that shows up so good over black polish. I think it is everything you want from a silver stampingpolish!


In this macro you can see that it also stamped the thin legs really well.

There is a little point of criticism and that is that the polish is a bit coarse, so it is difficult to get small lines to stamp, because I got the idea that the polish can't go in the narrow lines of intricate images. 

I wanted 2 little spiders instead of 1 bigger spider, but I couldn't get it to stamp. So 1 big spider is is ;)


I also made a winter-themed design with a drymarble blue background over which I stamped snowflakes with the stampingpolish.

It is a bit hard to see, but the snowflakes were perfectly stamped and you could see them very well on the blue background.
To bad the I wasn't able to capture it on photo.


And then I also made a design with the stampingpolish, but I used it as a background for this alien-design. Because it is such a pigmented polish, I only need 1 coat for full coverage. It is a lovely shade of silver, very bright and shiny.


I am very positive about this stampingpolish! I would recommend it for stamping, but also as a one-coater nailpolish.

You can find the stampingpolish HERE or go to www.bornprettystore.com and search for item #22321.
*If you like this stampingpolish, you can get these plates and a whole lot more at Born Pretty Store and if you use my code, LWGK31,  you get 10% of your purchase*


Sunday, July 12, 2015

Stampingplate Y015, review for Born Pretty Store


This is my review of stampingplate Y015 that was kindly send to me by the Born Pretty Store and is item #20721

I can tell you right away that I love this plate and am really pleased with how the images stamped!
As you can see on the image below, the image transferred with no problems!

The thing that is a pity, but that is because I have really small and rounded nails: I could not get the whole image on my nails. 
It is a big image, but if you have wider nails, then you'll be having no problems with fitting the image of the dragon on your nails!


I stamped my dragon over a golden and green nailfoil-base and as you can see it transferred beautifully to my nail.
To make the image stand out a bit more, I decided to fill in the eye with white and a black dot and that was a great addition.


The plate also has really nice flowers that I also stamped over nailfoil, pink this time. (the pink bled trough the white stampingpolish, even though i added a layer of clear nailpolish.)
I am really impressed about the quality of the plate! 
Look at my accentnail: this is a full nail stamp that is flawless!


I really recommend this plate if you want a big image that can go over all your nails and still looks stunning!
You can get this plate, and a whole lot more, at Born Pretty Store, itemnumber #20721
If you use my code LWGK31, you can get a 10% discount on all items, so also this stampingplate.


What do you think? Will you buy this plate?


Saturday, July 11, 2015

Stamped Dragon over a Gold and Green Foil base - Pictorial


For today I have another Pictorial for a product send to me by Born Pretty Store to review.
I will post my review tomorrow, so first I can show you how to achieve this Fierce Dragon design.


I first painted a white basecoat with 'Snow Me White' by Sinful Color over which I painted 2 layers of  'Bring it Sheer', a gorgeous pastel green with iridescent glitters.


Then i waited until the basecolor was completely dry, with some help of a fast drying topcoat. When the topcoat was completely dry, I applied the nailfoil-glue. Not over my whole nail, but only on certain parts of my nail. It is too bad you can not see it clearly in the above photo.


When the nailfoil-glue was tacky and changed from white to translucent, I first applied the green nailfoil to my nail. 
With only touching my nail ever so lightly, I added the green. Not to much, because it is a really striking color. 
After the green, I added the gold over the rest of the glue that was not covered with the green foil.
When the foil was how I liked it, I applied another layer of fastdrying topcoat.


Then it was time for my favorite part: the stamping!
I used black stampingpolish by Dashica and my squishy stampinghead.
Look at how gorgeous the image of the dragon stamps! 
It is just stunning!


Look at how gorgeous this Dragon is, stamped over the gold and green nailfoil! To let it stand out more, I painted the eye white with a black dot for it's iris. But that is all this stamp needs!


And this is how the whole Dragon looks like, stamped on my 4 nails.
It was a bit of puzzling how to place the parts of the Dragon so it looked like a whole, but I think I did a good job ;)


This design is done with stampingplate Y015 from the Born Pretty Store, itemnumber #20721
If you use my code LWGK31, you can get a 10% discount on all items, so also this stampingplate.

I hope you like my Pictorial!


Sunday, June 14, 2015

Purple Sharpie with stamped flower - Pictorial


For this cute purple design I've made a pictorial. I hope you like it!

This are the products I've used:


- Flomar Matte White, because I've noticed that a matte basecoat works better with the markers.
- Purple, Pink and Blue markers, a brush and alcohol. I've used 70% alcohol and that works great, but there are tutorials which use a higher %
- Kleancolor 'Purple Metallic' and Dashica 'White' for stamping, Simplism Style stampingplates 04 and 16 (I've got these from AliExpress)
- Topcoat. I use Seche Vite
- Caviar beads. I've used purple one, because of the purple theme.


Apply the white nailpolish


When the polish is dry, use the markers to color on your nails. I just drew some random stripes with all the colors.


Take your brush and dip it in the alcohol. A little bit goes a long way. 
Then let your brush lightly touch the markerink and let the magic happen! 
I love to see how the alcohol makes the ink work ;)


Repeat the previous 2 steps until you are satisfied with how it looks. 
I've got this result after repeating the 2 steps 3 times. I then applied my Seche Vite as a base for the stamping.


This image is on stampingplate Simplism Style 16 and I've used the Kleancolor polish for the stamping.


Stamp the image on your nails.


This image is on stampingplate Simplism Style 04 and I've used the Dashica polish for the stamping.


Stamp the image on your nails.


And for the final touch, the caviar beads, I've applied another coat of the Seche and placed the beads in the heart of the flower. Finish with a last coat of topcoat. Don't forget to dap the topcoat on the beads so it doesn't look like a big blob with beads in them.

And then you are ready!

I hope you like my pictorial!

Leave a comment when you have questions or just want to say if you like or dislike my nails and/or pictorial!

Saturday, June 6, 2015

Stamped Ladybugs over Golden Flowers


For this Ladybug-design I've made a pictorial of all the steps I've made.
And I am back to nubbins, because of a nasty break in my middle-finger. But with this design I don't mind rocking them ;)


First I've painted all my nails with Essence ''Wonder Wow! Man!', a gorgeous golden polish that is opaque in 2 coats.
When the basecolor had dried completely, I started with the first stamping layer.


For the flower-image I used stampingplate JQ-L18 (bought on AliExpress) and Catrice '(S)Wimbleon', a light aqua/teal greenish color, that stamps wonderful!


The nail stamped with the flowers looks like this, after cleanup. I topcoated with Seche Vite, because I mess up my decals a lot, so with a layer of topcoat it is easy to remove the decal or stampingimage.


For the ladybug I use a cute image of a stampingplate by (I think) Shany, but I cannot find the plate anywhere, so I can't tell the plate number.
As you can see, the whole image didn't transfer correctly, but I don't mind, because nobody is perfect ;) Even precious ladybugs.... (or I am just making excuses) 
I've used multiple stampingheads, so I can make more decals at once.


When the black stampingpolish was completely dried, I filled all the body's in with a bright red.(Dashica 'Pure Red' in my case) Because of my multiple stampingheads, I could immediately fill the images with the red, when I finished stamping the ladybugs.
The red took a little more time to dry, but within 10 minutes, I could start with transferring the ladybugs.
Because the images are not to big, I just placed the stampinghead on my nail and the ladybug had no problem being transferred to my nail. (except for the tiny little feet)


I am really pleased with how this design came out and those nubbins.... they will grow and before I know it, I have long(er) nails again. But until that time: #embracetheshorties !